In our industry, we use expensive, specialized and complex equipment to get the job done. To the average person, the work we do can often look impossible. But to us, it’s second nature. Especially being safe. Among the most important and relied upon tricks of the trade, however, is a tool that is absolutely free.
Knots are amazingly versatile tools. A person armed with nothing but knowledge and a rope can create entire mechanical systems capable of manipulating massive amounts of weight in a multitude of ways. Whether felling a 200ft pine tree or hanging up seasonal decorations, knots are something everyone can use.
Today, we will discuss three of our most commonly used knots and what they are used for. To learn how to tie them, refer to the illustrations at the bottom of the page.
The Bowline
First up is the most-used knot in our industry— the bowline.
The bowline knot, like many knots, gets its name from sailing. On a square-rigged ship, a bowline is one of the many lines that is used to control the ship’s sails, and the bowline’s strong and simple construction made it the ideal candidate for securing the bowline. This knot, however, far predates the sailing ships. The first evidence of a bowline knot was found on an ancient Egyptian ship, dating back to 2500 BC.
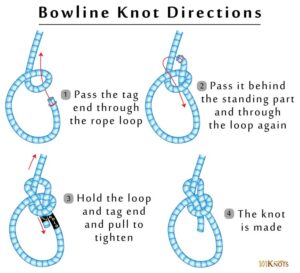
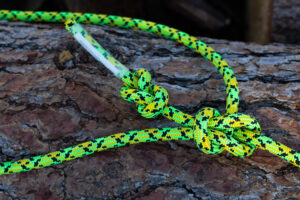
The bowline knot (figure 1) is a simple method of adding a fixed loop to the end of a rope. It is very strong, easy to tie, and perhaps most importantly, easy to untie after being subjected to a heavy load.
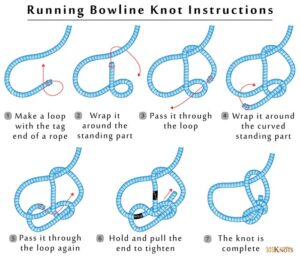
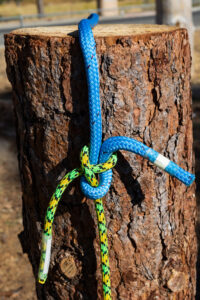
By pulling the main rope through the bowline loop, a running bowline is formed, which functions as a kind of noose. A running bowline can be wrapped around an object (such as a limb of a tree), and will tighten when the standing end of the rope is pulled. In our industry, this is ideal for pulling trees over, belaying limbs out of a tree that is being removed in pieces, creating anchor points, and much more.
Remember, not all knots are of equal strength. A rope that is bent at a sharp angle is much weaker than a rope that is straight. This means that a knot’s strength can be determined by the radius of its tightest bend. With this in mind, the Yosemite finish is a common modification to the already-strong bowline. By running the tail of the rope back through the turns of the knot, the radius of the bends that form the knot are enlarged, making the knot significantly stronger and more secure. (figure 2)
The Cow Hitch
The next knot we will discuss is the cow hitch. While hitches are generally classified under the “knots” umbrella, there is a difference between a hitch and a true knot. A knot holds its form independent of other objects. A hitch, on the other hand, must be tied around something to stay tight. If a hitch were to be removed from whatever it is tied around, it would fall apart.
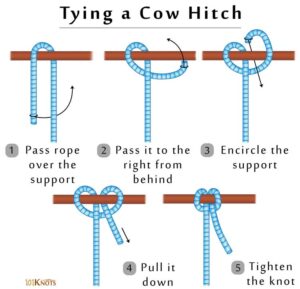
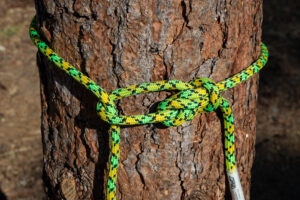
The cow hitch (figure 3), named after its use to secure cows, is a simple means of attaching a rope or sling to an object. Our crews mainly use the cow hitch when attaching a sling to the trunk of a tree. This provides a strong anchor point, where a mechanical advantage device such as a come-along can be attached.
Strengths of the cow hitch include quick and easy setup, a construction free of tight bends (resulting in extremely high strength), and the ability to be easily undone after a high load has been applied. We always back up a cow hitch with another half hitch, preventing the hitch from slipping under heavy load.
The Sheet Bend (aka, the Weaver’s knot)
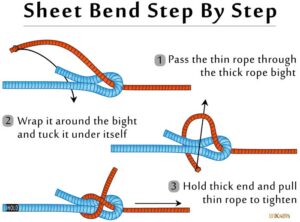
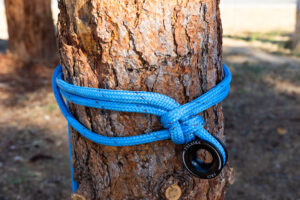
The last knot we will talk about is the sheet bend, also known as the Weaver’s knot. A bend, like a hitch, is another specific type of knot. Bends are used to join two lengths of rope. The sheet bend (figure 4) (which once again gets its name from sailing, where it is used to bend ropes to sheets, or sails) is an ideal bend because, like the other knots in this article, it is both simple to tie and does not jam under load. For this reason, it is widely regarded as one of the most essential knots in the world. The sheet bend’s construction is remarkably similar to the bowline, but it involves two ropes instead of one.
In our industry, the most common uses for a sheet bend include sending a rope up to a climber in a tree, as well as joining two lengths of rope to facilitate a technical rigging setup (for example, joining two 80ft ropes to pull over a tree from a safe 100ft distance). The sheet bend, like its bowline relative, is extremely strong and secure, making it ideal for any type of rigging situation.
While these knots are all very secure, we take extra steps to ensure safety wherever possible.
Firstly, we teach the “Tie, Dress, Set” method when using knots. Tying the knot, the step shown by the graphics in this article, is the first step. The knot should be kept loose at this point. Dressing is the second step, in which the rope must be manipulated until it looks exactly like a textbook example of the knot. A correctly tied but incorrectly dressed knot is prone to binding, weakness, and unraveling. Additionally, it can make the knot hard to identify, which can present more dangers. The knot should only be tightened, or set, after it has been tied and dressed properly.
The second extra safety step we employ is a back-up knot, also known as a stopper knot. This simple knot— usually a figure-8, is tied in the tail of another knot, preventing the tail from slipping through the knot and causing it to unravel.
Knots are infinitely useful and intriguing tools that we can all keep in our inventory. We hope our passion for rigging excellence and safety can be passed on to everyone, regardless of their industry.